
xTool Studio (2025 Update) Software Overview Tutorial - For Beginners
xTool Studio (previously xTool Creative Space) is the software used to connect to the xTool product line. As written on the xTool website, the company's goal is, “to create engraving and cutting tools to replace the much less powerful knives and scissors, by making the most of laser and software technology.” As a high school teacher who teaches in the makerspace, I have spent countless hours helping students expand their creativity through the use of a laser cutter. Through this, I have developed a solid understanding of the xTool software and tools needed to turn almost any idea to life. Here is an beginner-friendly overview to help grow confidence in the xTool Studio software (not sponsored):
Computer Type Disclaimer:
For this overview, I will be utilizing screenshots/screen recordings from a MacBook Air with the macOS for Intel chip software download. In my experience, the xTool Studio software looks different depending on the type of computer being used. In general, the tools are in similar locations. To identify different tools, you can hover your cursor over the icons. This will cause the title of the tool to appear on your screen.

Tutorial Overview:
The Main Menu
The “Save” Button
The “Import” Button
The “Text” Tool
The “Shapes” Tool
The “Shape” Tool Functions
Combining Shapes
The “Templates” Feature
The “Elements” Feature
The “Applications” Tab
AIMake
Specific Settings
Laser Engraving/Editing Photographs
Using the Laser Cutter
Laser Cutter Safety
1. The Main Menu
The Main Menu is located in the upper lefthand corner through clicking on the xTool logo. Clicking on the logo causes different options to appear. Review the image and option number below:

Option 1: Back to Homepage
Brings you back to the homepage where you can access previous projects, templates, and more.
Option 2: File
Typical features found under a file tab. This is where you can open projects, import images, save your file, and export the file.
Option 3: Edit
Used to undo/redo edits. It is also where you can use the copy/paste/cut/delete features. For these features, I normally just use the Apple keyboard shortcuts to make my edits quickly.
Option 4: Arrange
Very important features to understand! Used when working with layers, which are important to use in the score/engrave/cut process. More detailed information shown about these features further in this tutorial.
Option 5: Object
Many key features are under this tab. More detailed information shown about these features further in this tutorial.
Option 6: Text
The actual text tool needs to be utilized first. Once a text box is clicked on, the size, font case (lowercase/uppercase), and alignment can be altered. “Split Text” is an option under this tab where individual letters can be changed to their own text box.
Option 7: View
View provides options on what the software can look like. It allows the user to add/take away the grid and change the color of the background.
Option 8: Help
This feature take the user to the xTool Support Center.
Option 9: User Guide
Provides a brief step-by-step guide on the key software features.
Option 10: Settings
Allows the user to change specific things to make the software more custom to their needs, such as the measurement unit type.
2. The “Save” Button
Under the Main Menu button is the save feature. It is important to know that xTool Studio does NOT automatically save. In my experience, I would recommend using “File - Save As” instead of the “Save” button. The “File - Save As” feature allows the use to decide if they want to save it locally (directly onto the computer) or to “My Space” ( which an xTool Space account is needed for).
Personally, I recommend saving your files to both. You never know what can happen! Since my students rotate computer usage and tend to forget account information, I encourage them to also export their current file and upload it to their Google Drive. That way they can access it on any computer and locate it easily.

3. The “Import” Button
If you created your design in a different software (such as Adobe Illustrator), you will want to export it as an .svg file. If you are wanting to engrave an image, you’ll want to save it to your computer first. Once you have your .svg file or image, you’ll use the import button to add it to the software.
Personally, I rarely use the import button since xTool Space has the option to drag-and-drop files and images into the software. It is quicker for me to do this than having to search my downloads for what I need!
4. The “Text” Tool

Option 1: X & Y Axis
Where the text is located on the work plane.
The user can type text to the X and Y for a more precious location if needed.
Option 2: Hight & Width
The size of the text. In the xTool settings, the user can decide if they want measurements to be displayed in inches or millimeters.
The user can type text to the W and H for a more precious size if needed.
Option 3: Link/Unlink Height & Width
Linked: The height and width will size together when making adjustments.
Unlinked: The height and width will not size together when making adjustments.
Option 4: Text Angle
Type in the angle degree. The text will adjust to the desired angle.
Option 5: Arrange
These are layer ordering commands that control the stacking arrangement when working with layers.
Bring to Front: Moves the selected text to the very top of the layer stack, placing it above all other objects. It will be fully visible and overlap everything else.
Send Backward: Moves the selected text to the very bottom of the layer stack, placing it behind all other objects. Other elements will appear on top of it.
Bring Forward: Moves the selected text up one position in the layer stack.
Send to Back: Moves the selected text down one position in the layer stack.
Option 6: Align
These are alignment commands that position text/objects relative to each other. More than one text/image needs to be selected for the commands to be functional.
Align Left: Aligns the left edges of selected text boxes to a common vertical line. All text boxes move horizontally so their left sides line up.
Horizontal Align Center: Aligns the horizontal centers of selected text to a common vertical line. Text boxes are positioned so their midpoints (left-to-right) line up vertically.
Align Right: Aligns the right edges of selected text boxes to a common vertical line. All text boxes move horizontally so their right sides line up.
Align Top: Aligns the top edges of selected text boxes to a common horizontal line. All text boxes move vertically so their top sides line up.
Vertical Align Center: Aligns the vertical centers of selected text boxes to a common horizontal line. Text boxes are positioned so their midpoints (top-to-bottom) line up horizontally.
Align Botton: Aligns the bottom edges of selected text boxes to a common horizontal line. All text boxes move vertically so their bottom sides line up.
Align Center: Aligns both the horizontal and vertical centers of selected text boxes, positioning them so they share the same center point. This combines both horizontal and vertical center alignment, stacking text boxes directly on top of each other at their center points.
Option 7: Reflect
Allows selected text box to be reflected horizontally or vertically.
Option 8: Text Font
Provides many different font choices for the user’s design.
Option 9: Font Styling
Once selecting a font, the user can decide if the text will be:
Regular
Italic
Bold
Bold Italic
Option 10: Text Size
Adjust the point size of the font.
Option 11: More
Leading: The vertical space between lines of text.
Spacing: Controls the horizontal space between the letters.
Text Alignment: Controls how text lines up horizontally within a text box.
Left-aligned: Text lines up along the left edge
Center-aligned: Text centers on a midpoint
Right-aligned: Text lines up along the right edge
Original Case or Uppercase: Text capitalization options that change letter case without retyping.
Option 12: Weld
Combines multiple overlapping shapes into a single, unified object.
Option 13: Offset
Creates a new shape around the the letters (essentially an outline) by a specified distance.
Primarily used when wanting to cut a unique shape with the laser cutter, such an a keychain with text in it.
Option 14: Rotate
Click on the circle and drag the text to the desired angle.
Option 15: Text Size (Again)
Click and drag on the white squares to size text.
Option 16: Curve Text
Click and drag on the icon to curve the text.
5. The “Shapes” Tool

Hover over the “shape” tool to reveal different shape options. Options include:
Line
Rectangle
Circle
Polygon
Star
Vector: Essentially a free draw tool (similar to connect the dots). To create curved lines, click and drag on the the vector point while holding down the option key). To complete the vector, create a closed shape.
6. The “Shape” Tool Functions

The shape tool function includes a number of the same features that is used for text.
Option 1: X & Y Axis
Where the text is located on the work plane.
The user can type text to the X and Y for a more precious location if needed.
Option 2: Hight & Width
The size of the text. In the xTool settings, the user can decide if they want measurements to be displayed in inches or millimeters.
The user can type text to the W and H for a more precious size if needed.
Option 3: Link/Unlink Height & Width
Linked: The height and width will size together when making adjustments.
Unlinked: The height and width will not size together when making adjustments.
Option 4: Text Angle
Type in the angle degree. The text will adjust to the desired angle.
Option 5: Arrange
These are layer ordering commands that control the stacking arrangement when working with layers.
Bring to Front: Moves the selected text to the very top of the layer stack, placing it above all other objects. It will be fully visible and overlap everything else.
Send Backward: Moves the selected text to the very bottom of the layer stack, placing it behind all other objects. Other elements will appear on top of it.
Bring Forward: Moves the selected text up one position in the layer stack.
Send to Back: Moves the selected text down one position in the layer stack.
Option 6: Align
These are alignment commands that position text/objects relative to each other. More than one text/image needs to be selected for the commands to be functional.
Align Left: Aligns the left edges of selected text boxes to a common vertical line. All text boxes move horizontally so their left sides line up.
Horizontal Align Center: Aligns the horizontal centers of selected text to a common vertical line. Text boxes are positioned so their midpoints (left-to-right) line up vertically.
Align Right: Aligns the right edges of selected text boxes to a common vertical line. All text boxes move horizontally so their right sides line up.
Align Top: Aligns the top edges of selected text boxes to a common horizontal line. All text boxes move vertically so their top sides line up.
Vertical Align Center: Aligns the vertical centers of selected text boxes to a common horizontal line. Text boxes are positioned so their midpoints (top-to-bottom) line up horizontally.
Align Botton: Aligns the bottom edges of selected text boxes to a common horizontal line. All text boxes move vertically so their bottom sides line up.
Align Center: Aligns both the horizontal and vertical centers of selected text boxes, positioning them so they share the same center point. This combines both horizontal and vertical center alignment, stacking text boxes directly on top of each other at their center points.
Option 7: Reflect
Allows selected text box to be reflected horizontally or vertically.
Option 8: Edit
Allows the user to edit and add vector points to the shape. The user edits the vector points by clicking and dragging them to their desired location.
Option 9: Offset
Creates a new shape around the the letters (essentially an outline) by a specified distance.
Primarily used when wanting to cut a unique shape with the laser cutter, such an a keychain with text in it.
Option 10: Rotate
Click on the circle and drag the text to the desired angle.
Option 11: Height & Width (Again)
Click and drag on the white squares to size text.
7. Combining Shapes

Overlap the two shapes. Select both of the shapes. The following options appear:
Option 1: Unite
Option 2: Subtract
Option 3: Unite at Overlap
Option 4: Subtract at Overlap

Option 1: Unite

Option 2: Subtract
The shape that is on the bottom layer will have the shape on the top layer subtracted from it.

Option 3: Unite at Overlap

Option 4: Subtract at Overlap
8. The“Templates” Feature

Pre-made xTool Space files that users can laser cut.
If it has a small crown in the corner of the template image, that template needs to be purchases.
9. The “Elements” Feature

Elements are free shapes and designs that can used in the work plane. Click on the element and it will appear on the work plane. Elements can be edited.
Categories include:
Basic
Plant
Animal
Flower
Pure Hand Drawn
Black and White Mandalas
3D Embossed
Music Player
Geometric Lines
Fishes
Halloween Illustrations
Head Avatars
Lifestyle Illustrations
Hand Drawn Styles
Others
Vintage Bonsai
Coffee Shop
Fancy Fonts
Border
Other
Parts
Festival
Pattern
Embossment
10. The “Applications” Tab

By hovering over each tab, an explanation appears for each function. Below are the direct explanations from xTool as well as my additional comments:
Function 1: Grid Array
“Click to create a grid array.”
A grid array evenly spaces the design on the work plane.
Benefits: Reduces material waste and reduces cut time.
Function 2: Circular Array
“Click to create a circular array.”
A circular array is useful if your a creating a repeating circular pattern (such as a mandala).
Function 3: Material Test Array
“Click to create an array to test parameter settings for your material.”
Function 4: Code Generation
“Enter a text to generate a barcode or QR code and add it to your design.”
The user will want to copy and paste the link into the designated spot. Great for promotional QR codes!
Function 5: Smart Nesting
“Leverage intelligent algorithms to optimize material use and generate efficient nesting plans.”
Function 6: Batch Fill
“Recognize materials of the same shape and specification and create the same object for them.”
Function 7: Measurement
“The ‘Distance Measurement” button on the panel can be used to enable/disable the distance measure mode. Once enabled, click to set the start/end point for measurement.”
Function 8: Earring Generator
“Select earring styles, mix and match charm types and quantities, and quickly create multiple earring combinations.”
Function 9: Keychain Generator
“Choose a keychain style, customize text or initials and layout, set the hanging-hole position and size, and quickly generate multiple variations. Export cut-ready vector paths.”
Function 10: Box Generator
Choose a style, adjust parameters, and generate a parametric box with linkedparts and auto finger joints-export cut-ready vectors.”
Function 11: Map Designer
“Create multi-layer maps with terrain elements like roads, bridges, and more.”
11. AIMake

Artificial Intelligence in xTool Space
How to use:
Choose your style. For this example, I am using the “Vector-2D Graphics” feature.

Write your prompt.
With AI, the longer the description, the more likely it will generate something that you want.

In the xTool software, you are given a set amount of credits for free. If you frequently use this tool, you will need to buy more credits in the software.
Once AI has generated a file you want to use, click on it. You then can edit it’s features to be cut/scored/engraved.
12. Design Done? Time for Specific Settings!

Step 1: Select Material Type
Why do this first? xTool has pre-programed specific settings based on the material type. To use the pre-programed settings, they are shown under the “one-click set” feature.
I will be using 3mm Basswood Plywood.

File Example: Keychain - Designed in Adobe Illustrator
Sometimes you may not be able to access the following features until the computer is connected to the device.

Step 2: Score Settings
Score: Processes only the outline of a graphic
With the 3mm Basswood Plywood already selected, xTool has auto selected the following:
Power: 20 (how strong the laser is)
Speed: 150 (how fast the laser moves)
Pass: 1 (how many times the laser goes over the same area)

Step 3: Engrave Settings
Engrave: All the closed area within the outline
With the 3mm Basswood Plywood already selected, xTool has auto selected the following:
Power: 10 (how strong the laser is)
Speed: 250 (how fast the laser moves)
Pass: 1 (how many times the laser goes over the same area)

Step 4: Cut Settings
Cut: The graphic will be cut out through its outline
With the 3mm Basswood Plywood, I recommend the following to ensure the wood is cut fully through:
Power: 100 (how strong the laser is)
Speed: 35 (how fast the laser moves)
Pass: 2 (how many times the laser goes over the same area)
13. Laser Engraving/Editing Photographs

Importing the image into the software:
Step 1: Click on the main menu button
Step 2: Click “File” - “Import Image”
Step 3: Find the image on your computer
Option 2: Drag and drop the image into the software

Once the image is selected, click “edit” in the tool bar at the top of the screen.

Editing Options: Adjustments
Greyscale option: Removes all color from the screen, converting it to shades of gray
Invert option: flips all colors on the screen to their complementary color
Sharpness editing tool
Saturation editing tool
Brightness editing tool
Contract editing tool
Temperature editing too
Tint editing tool

Crop Image
Different ratios are provided to make the image different dimensions .
You also are able to manually type in the size if desired.

AI Cut Out
Required xTool credits.
Selects the main object from the image for you.

Manual Cut Out: Magic Wand and Eraser Tool
Magic Wand Tool: selects areas of the image based on similar colors, allowing delete specific parts without manually using the eraser.
Eraser: Removes the selected areas.

Trace Image
Creates an outline of the main areas of the image.

Filters
Once clicking on the filter, it will be applied to the image.
These are the most helpful for laser engraving an image!
14. Connect Computer to Device

Select Device
I will be using xTool P2 CO2 Laser Cutter 55W.
Insert the Material

Using the clips, secure the material inside the laser cutter.
Refresh
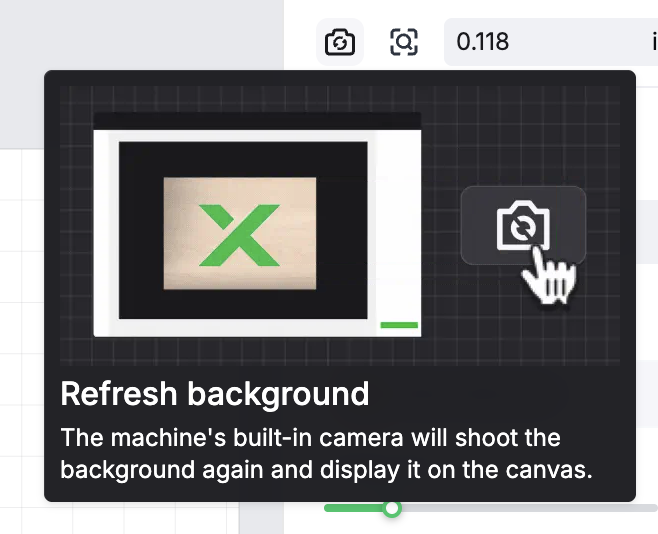
Click the refresh button to show the inside of the laser cutter.
There is a camera inside the laser cutter. The refresh button will active this.
Resize Design

Resize and place design on the material in desired spot
Click “Process”, Then “Start”
After clicking “Start,” you need to click the silver start button on the laser cutter.

All Done!

Open lid of laser cutter.
Before removing design, make sure it is fully cut! If not, do not move. You can use the the “output” function to select the areas that do not need to be laser cut again.
15. Laser Cutter Safety!
The ventilation system MUST be plugged in and on when laser cutting. Why?
Keeps the air clean while we work.
Removes smells and fumes.
Keeps you and the laser cutter healthy.
Do NOT leave the laser cutter while it is cutting your design.
Do NOT open the lid of the laser cutter while it is cutting your desig
If a fire starts in the laser cutter, remain calm, unplug the ventilation and activate the fire extinguisher attached to the laser cutter.